Teaching Handwriting In Your Homeschool Kindergarten
Affiliate and Referral links are used below to promote products I love and recommend. I receive a commission on any purchases made through these links. Please see my disclosure policy for more details. As an Amazon Associate, I earn from qualifying purchases.
Welcome back to another Teaching Handwriting in Your Homeschool post. Last week we looked at teaching handwriting to preschoolers. This week we will tackle teaching handwriting to your kindergarten-age child.
Kindergarten age is typically 5 to 6-year-olds. This age is typically when I like to really start pushing proper letter formation.
Pre-Writing Lines Come First
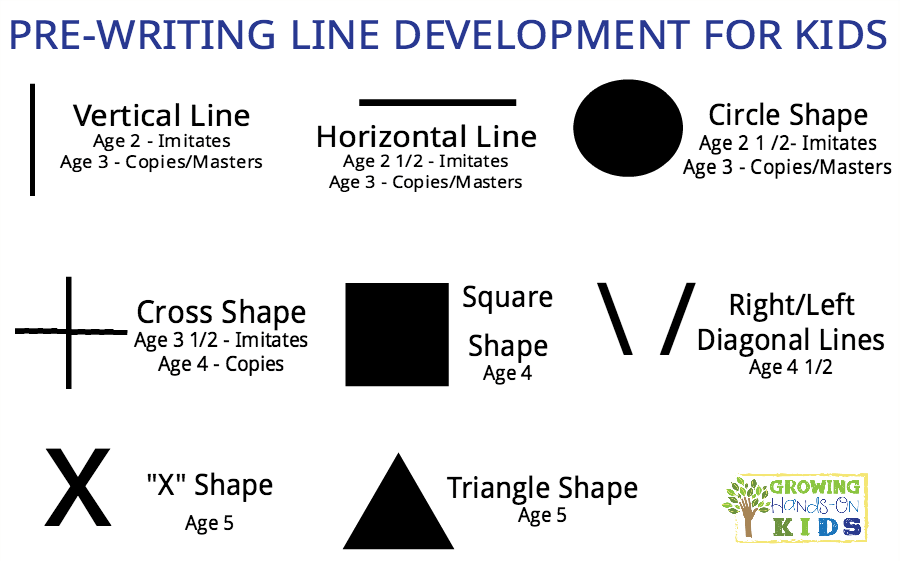
Remember the pre-writing lines that we talked about last week? Well, now we are going to take those pre-writing lines and begin forming letters with them! If your child does not have good pre-writing line formations, then I suggest you start there before teaching actual letter formation.
Strong pre-writing skills equal strong letter formation skills later on. Here are a couple of great resources for you if you need a starting place for pre-writing lines and getting your child ready for Kindergarten.
Basic Shapes for Beginners: A Hands-On Approach to PreWriting Strokes for Preschoolers – 6 weeks of lesson plans and resources.
Basics of Pre-Writing Lines – Developmental Tips, Tools, and Strategies for Handwriting Readiness.
Letter Formation for Handwriting
The main thing to remember when teaching letter formation is that ALL letters start at the top and from left to right. Same as when we read, starting at the top, and working from left to right. One of my favorite resources for teaching proper letter formation is Handwriting Without Tears. I took their preschool training a while ago, but their KG curriculum is also excellent. Whenever I taught letter formation at work, I always used the Handwriting Without Tear's protocol.
HWT gives you specific language to use when forming each letter. This goes along with the phrases I use in my preschool ebook Basic Shapes for Beginners. Using the same phrases when you teach letter formations is so important. It helps your child to associate that letter with the proper formations!
An example would be: “The letter ‘I' – One line down, one line across the top, one line across the bottom.”
It is definitely a good idea to start with capital letters first and then move on to lower case letters. Capital letters use all the pre-writing lines that kids learn first and so that will be easier for them to learn. Once they have mastered capital letters you can move to lower case.
Also teaching children how to write their names is definitely the first thing you want to focus on when learning how to print letters. I would even teach it in all capitals to start out with. Then move on to lower case letters for their name, and then all other lower case letters.
Remember that children age 5-6 are still in the phase of learning where they do more learning through their hands than their eyes. Yes, they will need to practice actual letter formations with pencil and paper, but it is important to mix in all kinds of sensory experiences for them when learning how to form letters.
Other Resources for Teaching Proper Letter Formations
Learning Letters with Pipe Cleaners – Make and Takes
Alphabet Lego Printable Cards (Uppercase) – Wildflower Ramblings
Velcro Dot Pop cycle Sticks for Letter Formation – Tot Treasures
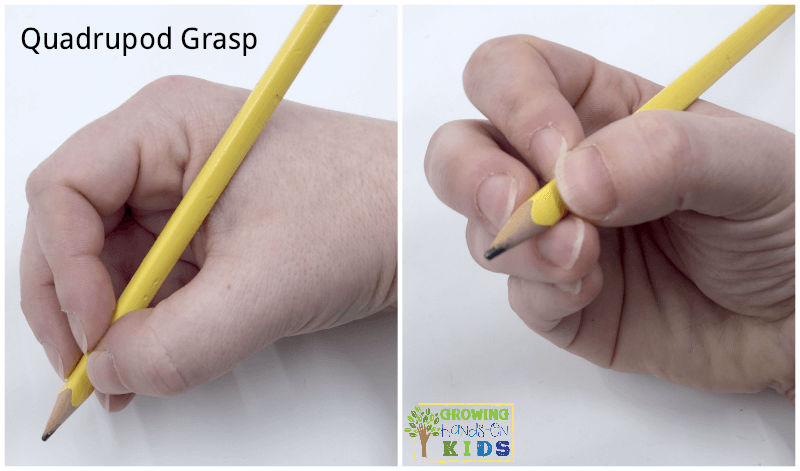
Proper Hand Grasp for Handwriting
There are two types of hand grasp that are considered efficient for handwriting: tripod (3 finger grasp) and quadruped (4 finger grasp).

Hand grasp is something that most preschoolers should have mastered by age 4. However, if your child is hitting kindergarten and does not have a good pencil grasp, this is something you need to focus on now. The longer a child uses an incorrect grasp on their pencils, the harder the habit is to break.
Hand dominance is also something that most children have decided on by age 4. If your child tends to use both hands for writing, take a look and see which hand they typically start an activity with. If it is their right hand, then they need to use that hand for the entire activity.
If it is their left hand, then the same thing. When you allow your child to switch hands throughout a writing activity, this does two things. It does not force them into choosing a dominant hand and it also can signal that their fine motor strength in that hand is not strong enough.
If you notice that your child is switching hands a lot during writing activities, then focusing on fine motor strengthening activities is important. In particular, ones that mimic the proper way to hold a pencil. Using fine motor tweezers or tongs in fine motor activities would be a great activity to focus on.

3 Tips for Fixing Pencil Grasp
- Take small pom pom or coin and have them hold it in their hand with their 4th and 5th finger (ring and pinkie finger) while holding a pencil. This will remind them to keep the first 3 fingers on the pencil correctly
- Use small stickers on your child's pencil, giving them a visual reminder of where to put their fingers on the pencil.
- Tell your child to use their “Go” fingers (thumb, pointer and middle finger) for writing and keep their “Stop” fingers (ring and pinkie finger in their palm.
For more fine motor activity ideas check out my subscriber freebie, 50 Fine Motor Activity Ideas for Children Ages 3-6.
Other Resources for Teaching Proper Hand Grasp
Improving Pencil Grasp with Fine Motor Play – Sugar Aunts
Tips for Teaching Correct Pencil Grasp – Stay At Home Educator
Tips for Correct Pencil Grip – This Reading Mama
When to Fix a Pencil Grasp – The Anonymous OT
Teaching Proper Letter Size, Spacing, and Line Orientation in Handwriting
When children are just learning how to write, the main focus should be on letter formation. Once they have the proper formations mastered, you can begin to refine those with proper letter size, spacing between letters and words, and line orientation (where the letters are placed on the paper).
One great way to work on letter sizing is to use highlighted paper. This gives your child a visual of where to place the letters within the lines.
Here are a couple of resources I have found that give you some great paper options:

Proper spacing between words and letters is also an important skill. You can use popsicle sticks as a visual between words or just have your child place their index finger and middle finger of their non-dominate hand after each word. You can also purchase plastic finger spacers, I have used these many times successfully with students.
Here are more resources for addressing problems with spacing in handwriting.
Addressing Problem Areas in Handwriting
Letter reversals (particularly with “d” and “b”) are common at this age. Actually, letter reversals are a typical thing you will notice until about 1st grade. Continue to model the proper formations for each letter. Children can also benefit from doing activities or games that use directional words such as “left” or “right”.
The most common letter reversals are “d” and “b”. Use this verbiage talking about each letter.
Capital D – Big line down, big curve to the right
Lowercase d – big line down, little curve to the left
Capital B – Big line down, one little curve to the right, two little curves to the right
Lowercase b – Big line down, little curve to the right
Lowercase “p” and “q” are probably the next most common letter reversals. Use the same verbiage that I gave above to talk about how to form each of those letters as well.
Here are more resources for addressing problems with letter formation in handwriting.
Placing too much pressure on the pencil is another issue I often see in working with handwriting. This could indicate the child needs to focus on fine motor strengthening activities as well as core strengthening. When children tire they tend to press harder or lighter on the pencil. Giving breaks in handwriting is also a good idea.
Other Resources for Teaching Handwriting in Kindergarten
I have a page here on the blog with links to all of the handwriting posts I have written that can be very helpful.
Follow Heather @ Golden Reflections Blog's board Handwriting Skills & Activities on Pinterest.
Here are the other posts in this series:
Teaching Handwriting in Your Homeschool: Preschool
Teaching Handwriting in Your Homeschool: Elementary
If you have any questions that I did not address, please let me know in the comments below. I will be adding more information as I find it and will definitely address further questions in other posts. I would love to hear from you.

Heather Greutman, COTA
Heather Greutman is a Certified Occupational Therapy Assistant with experience in school-based OT services for preschool through high school. She uses her background to share child development tips, tools, and strategies for parents, educators, and therapists. She is the author of many ebooks, including The Basics of Fine Motor Skills, The Basics of Pre-Writing Skills, and co-author of Sensory Processing Explained: A Handbook for Parents and Educators.
Hi! Thanks for the wonderful and informative article! My son is in kindergarten and is way above his level in areas like reading, but his writing is a weak area. He has poor pencil grip and has been having lots of trouble with writing clearly. His teachers are concerned but I guess the system doesn’t consider it a concern at this stage so he won’t get intervention…I just don’t want it to go untreated if it’s a big issue. Anyway, I’ve tried the Pom Pom trick and the sticker thing but they didn’t work for him. Would the pencil grippers that you can buy and slip on pens/pencils be a good idea? Is there one style that’s best?
Also, a little stumped because he does other fine motor activities with no issue (he lives for Lego and is really good at building, he does beading, uses tweezers, we encourage him to use a knife to cut his food, we play games like Pick up Sticks…). Any other ideas other than working through a program like Handwriting without Tears?
Dear Heather,
Iam thinking of getting the Pre-K Handwriting without Tears program for my 4 year old. I’m a bit concerned that they start with upper case first, especially when we will be also doing a reading program in her native tongue (Afrikaans) which will obviously start with lowercase for the reading. Do you think it will be confusing for her to start learning to read in lowercase and start writing in upper case? Will really appreciate your thoughts on this. Thanx a lot. God Bless. Cornel Burger, South Africa
Hi Cornel,
The reason HWT starts with capital letters first is because those lines and shapes are developmentally what kids learn to write first. I will say that teaching reading is not my strong suite. However, I also know in the Montessori methods of learning to write and read they teach lowercase and uppercase letters at the same time because most children learn to read with lowercase letters mixed with capitals. They also teach writing first before reading.
I think with HWT, it’s more focused on the actual mechanics of learning the letters for writing more so than reading. Here is what they say about it on their site: http://www.hwtears.com/hwt/why-it-works/teaching-order
A great website for more reading resources is http://www.thisreadingmama.com. I will also do some extra research on this topic and come back to answer further or perhaps write a post on it!
Thanks for the great question.
You totally answered a silent prayer today…
I have 5 boys, and we have been homeschooling for 15 years. My number 4 son, age 11, has always been very tall for his age. He has incredibly long fingers and poor fine motor skills.
He is a brilliant student, but really struggles with penmanship.
Just today we were talking about finger grip as he was working on math. We all compared our grips on pencils and then moved on. I stood there trying to figure out how to retrain him at proper pencil grips. He has years of poor habits to break…
This article totally solved the issue for me. Holding a pompom with his 4th and 5th fingers… Brilliant!
Thank you for sharing this! It is so well written and informative.
Blessings
Hi Bekki,
I am so glad this post was helpful for you. Thank you for leaving such a sweet comment.
What a great post that will be very beneficial to homeschooling moms!
Thanks for sharing at Wow Me Wednesday!