Teaching Handwriting in Your Homeschool: Elementary Edition
Affiliate and Referral links are used below to promote products I love and recommend. I receive a commission on any purchases made through these links. Please see my disclosure policy for more details. As an Amazon Associate, I earn from qualifying purchases.
It's time for my last post in the teaching handwriting in your homeschool series. Today we will be talking about elementary age children and handwriting. We will also look at some common handwriting problems and how you can problem-solve around those.
Teaching Handwriting in Your Homeschool with Elementary Age Children
For the purpose of this post, I am defining elementary age children as grades 1-3 or beginning of 4th grade.
After your child has a good grasp of pre-writing lines in preschool and then turns those pre-writing lines into letters in Kindergarten, you are both well on your way to fine tuning their handwriting in grades 1-3.
Typically by the end of Kindergarten, children are beginning to write short sentences (3-4 words). Their letters may look large, not sitting directly on the writing lines, and they may still have some letter reversals. This is all normal and age-appropriate for them.
First grade is a great time to really start focusing on the accuracy and legibility of their handwriting. Also beginning to ask your child to produce more written work is typical. Instead of just 1 to 2 short sentences, you will want to have them start forming longer sentences and beginning to form paragraphs.
Punctuation, capitalization, and spacing are also skills that can be focused on as well. I am going to share some tips with you for many of these areas. We will also talk about some common handwriting issues and some tips and help you problem solve these issues.
Hand Grasp and Handwriting
In the last two posts we talked about using proper hand grasp on writing utensils (pencils, crayons etc), but it is worth mentioning here again.
There are two types of efficient grasp. The first one that most children should be using is the tripod grasp (3 finger grasp). As you will notice in the picture below, the index finger and thumb.

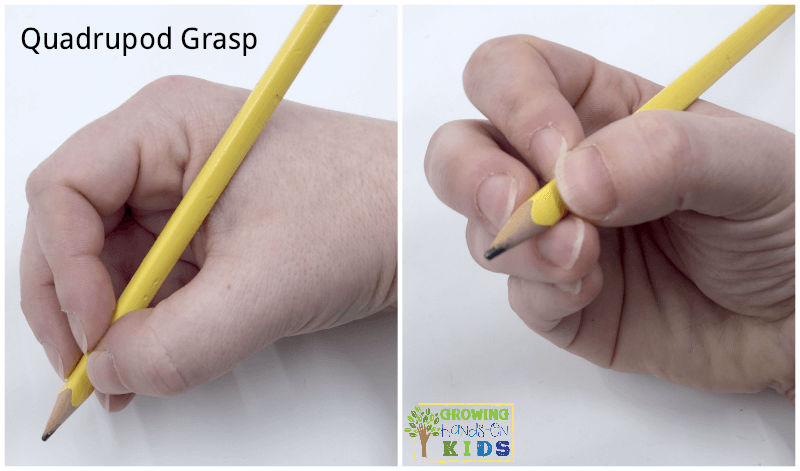
The second is called a quadrupod grasp and is a 4-finger grasp, as shown below.
Difficulty with Proper Pencil Grasp
Typically you will notice if children have problems holding their pencil correctly by Kindergarten. By the time they reach 3rd or 4th grade, those bad habits will be pretty hard to break. So trying to address their hand grasp now is important.
Some ideas for fixing hand grasp:
- Using a pom pom, coin, or small object that they can hold with their 4th and 5th fingers (ring and pinkie finger) like a fist. Then have them place either the index finger and/or middle finger into a proper tripod or quadruped grasp. *Note: I would definitely encourage a tripod grasp, however if they resort to a quadruped grasp, it isn't the end of the world. After all, I write with a quadruped grasp myself, as I am sure many of you do!
- Putting a sock over their hand and cutting out two or three holes for the appropriate fingers to slide through. (Watch the video above to see what it looks like).
- Stickers – Place two small stickers on the appropriate places on the pencil as a visual reminder. Or use a marker to draw smiley faces etc.
- “GO” fingers & “STOP” fingers – Go fingers GO on the pencil for writing, STOP fingers, stay as a fist in the hand.
So what do you do if your try all these ideas and your child STILL struggles?
- Pencil Grips – I try to leave pencil grips as a last resort or option. A lot of the times kids do not like them, loose them, forget to use them etc. Also depending on what kind you get, it may be a little costly to keep replacing them. However they can be helpful for some children.
The type of grip I had the most success with was the Grotto grip & Stetro grip:


Also with pencil grip it is important to work on a lot of fine motor strengthening activities. Anything with tweezers, tongs, grab sticks etc. are useful for strengthening hand grip!
Other Resources for Fixing Hand Grasp
- Pencil Grips and Writing Tools – Therapy Shoppe Online Catalog
- When to Fix a Pencil Grasp – The Anonymous OT
- Pencil Grips 101 – The Anonymous OT
- Pencil Grip Correction with a Pom Pom – 1+1+1=1
- Tips for Teaching How to Hold a Pencil – Rocks in My Dryer
- Tips for the Correct Pencil Grip – This Reading Mama
Letter Reversals in Handwriting
Letter reversals are common, especially in younger children just learning to write. Most letter reversals should work themselves out by 8 years old or so. So if you have a child who is older and still has issues with letter reversals here are some ideas for you.
First of all, I would go back to pre-writing lines and make sure they have a good foundation.
Next, I would focus on the letters they are having problems with, starting with the capital letters. “d” and “b” are common letter reversals as well as “p” and “q”. However, you want to go back and start over developmentally, which means starting with capital letters first.
Then move on to the lower case letters that they are struggling with. Go back to hands-on activities for teaching letter formations, that we talked about in the kindergarten edition of this series. Feeling how the letters are formed with their hands will help much more than just route tracing or copying practice.
Then move on to tracing, copying, and finally using those letters in a word or sentence. Here are some other tips and resources for letter reversals:
- How to Stop Letter Reversals in Handwriting
- Signs of Dyslexia? My child still has letter reversals, should I be worried? – Heidi Songs Blog
- Games for Letter Reversals – Boy Mama Teacher Mama
- Correcting Letter Reversals – Pediatric Occupational Therapy Tips
Spacing & Line Orientation in Handwriting
What I have found most helpful for teaching children about proper spacing and line orientation are a few simple tips below:
- Use a yellow highlighter and highlight the space below the dotted line and above the bottom line. This gives your child a visual of where the lower case letters go on the paper. Capitals start above that, lower case letters start at the dotted line, unless they have a tall line, like “t”, “l”, “h” etc…
- Use a pop cycle stick or a finger between words for a visual of how much space to put between words.
- Use raised line paper. I have found this at Wal-Mart in the office/school supply isle, typically the same one as Crayola® products.
There are many different paper options out there. Here are some of my favorites and resources to purchase it from.
- Specialty Writing Papers and Notebooks – Therapy Shoppe
- Smart Start K-1 Writing Paper – Amazon


- Raised Line Paper – Amazon

You can also purchase plastic finger spacers that make spacing words in sentences easy with a visual reminder.

You also want to promote a lot of eye-hand coordination type activities for your child to do, to strengthen that skill for handwriting and spacing. Some activities can include throwing, catching, climbing, rolling, scissor activities, and also many fine motor type activities.
Typically cursive is introduced around 3rd grade. However, if you have a special needs child who is struggling with print, you may consider starting cursive earlier. If a child is having problems with print, cursive can be easier for them because they do not have to think about lifting the pencil and starting over for each letter. It is one continuous motion, which can be easier for them to master.
I hope this series has been helpful to you. If you have any questions, feel free to leave them below and I will answer them as best I can, or at least point you in a direction for answers.
Here are the other posts in this series for you to check out as well:

Heather Greutman, COTA
Heather Greutman is a Certified Occupational Therapy Assistant with experience in school-based OT services for preschool through high school. She uses her background to share child development tips, tools, and strategies for parents, educators, and therapists. She is the author of many ebooks, including The Basics of Fine Motor Skills, The Basics of Pre-Writing Skills, and co-author of Sensory Processing Explained: A Handbook for Parents and Educators.
Great post! This brings back memories of grade school. 🙂 I used the Quadruped grasp. I think I was unique in my classroom with this grasp. It worked for me. 🙂